2018年3月20日 星期二

網域轉換 vs DNS轉換

什麼我的DNS不支援CAA? 

因公司官網主機換代管廠商,該代管廠商要求DNS需支援CAA(Certification Authority Authorization),官網才能使用「自訂網址」,而目前網域代理商SEEDNET(遠傳)不支援。

什麼是CAA(Certification Authority Authorization)?

簡單來講就是:在DNS中透過CAA Record,指定該域名憑證只能由指定的憑證機構發出。

網域轉換(網域轉出/轉入)-可以不用這麼做

一開始以為:那就把網域轉到支援CAA的網域註冊商去。
但這異動非同小可,不僅事關兩個網域註冊商之間的互動,還牽涉到兩個網域註冊商上層的審核。


如果都是國內網域業者,其上層同屬TWNIC,但因為我要轉到Godaddy,變成SEEDNET上層TWNIC、TWNIC再跨國和Godaddy交涉。
(為何要轉到Godaddy?因為國內很多網域註冊商尚不支援CAA,另外國內域名轉換都要公司用印,我官網上線在即,那還能等?所以就轉到Godaddy,只要刷信用卡一切搞定!)

情況變得複雜。僅管我馬上依指示從SEEDNET轉出、再到Godaddy轉入,但等了一天兩邊都沒動靜:

雖說兩邊都跟我說要等5-7天,但我有時間壓力,等不了那麼久!

網域不轉,轉DNS!

打了幾次SEEDNET客服,在葉先生、董小姐的建議下,先幫我把網域取消轉出,否則狀態在「轉出中」的網域所有設定都被凍結。

網域回復後,看著設定,我突然想到:何不把SEEDNET的DNS指向Godaddy就好了!

如下把SEEDNET設為「自行DNS代管模式」,把Domain Name Server、IP都指向Godaddy的DNS主機:


設定套用後,十幾分鐘後就反應了!省下5-7天的時間。

參考 


2016年6月12日 星期日

Why IHttpActionResult

Action Results in Web API 2 The IHttpActionResult interface was introducted in Web API 2. Essentially, it defines an HttpResponseMessage factory. Here are some advantages of using the IHttpActionResult interface:
  • Simplifies unit testing your controllers.
  • Moves common logic for creating HTTP responses into separate classes.
  • Makes the intent of the controller action clearer, by hiding the low-level details of constructing the response.
other advantages:

  • Respecting to single responsibility principle: cause action methods have the responsibility of serving the HTTP requests and should not involve in creating the HTTP response messages.
  • Useful implementations already defined in the System.Web.Http.Results namely: 
    • Ok
    • NotFound
    • Exception
    • Unauthorized
    • BadRequest
    • Conflict
    • Redirect
    • InvalidModelState
    • 完整列表
  • Uses Async and Await by default.
  • Easy to create own ActionResult just by implementing ExecuteAsync method.
  • you can use ResponseMessageResult ResponseMessage(HttpResponseMessage response) to convert HttpResponseMessage to IHttpActionResult.

2016年3月21日 星期一

Entity Framework使用資料庫View並設定關聯

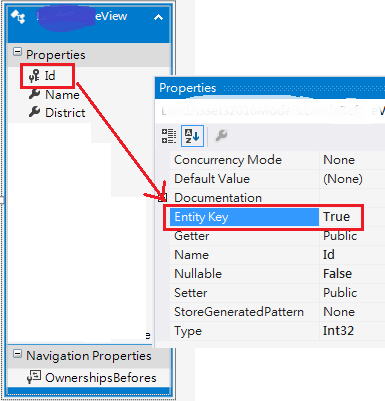
Entity Model除可用資料表外也可加入資料庫檢視(View),但需先正確設定View的Entity Key,如此關聯建立時才知如何對應兩邊的資料:


建立關聯時在關聯線上點兩下滑鼠,還需指定那一邊是主要(Principal)、那邊是相依的(Dependent):

2016年3月7日 星期一

Kendo UI Grid 匯出 PDF 中文變方塊解法

  • 第一階段:先讓Kendo Grid可以匯出PDF
1.在Grid上顯示匯出PDF按鈕
$("#grid").kendoGrid({
    //...
    toolbar: ["pdf"],
    pdf: {
        allPages: true
    }
}); 
2.載入 pako_deflate.min.js 啟用壓縮 PDF 功能
<script src="Kendo/js/pako_deflate.min.js"></script>
  • 第二階段:自訂中文字型
1.定義支援Unicode的TrueType中文字型,以下以DFKai-SB為例:
@font-face {
    font-family: "DFKai-SB";
    src: url("Kendo/styles/fonts/KaiU/kaiu.ttf") format("truetype");
}
2.透過CSS讓Kendo Grid(.k-grid)使用自訂的DFKai-SB字型:
.k-grid {
    font-family: "DFKai-SB";
}

2015年9月11日 星期五

架設Windows內部網路共用的Git伺服器(透過Visual Studio存取)

對於一個軟體公司來說,「資料備份分享」十分基本也十分重要。Git是目前最好的一個解決方案:免費,存取快速。

目的:
  1. 透過Visual Studio內建的「Team Explorer」-「Clone」複製Git伺服器上的專案
  2. 可離線編輯,「Commit」更新後再「Sync」同步至Git伺服器
做法分兩個部分:Git伺服器、開發人員電腦。

Git伺服器

  1. 準備一台Windows伺服器(如:server1),並建立一個目錄(如:d:\git),分享出來(如://server1/git)。
  2. 安裝Git for Windows。
  3. 在Git伺服器上為每個專案建立對應的Git儲存庫
    每個專案應對應到各自的儲存庫,不該多個專案放在一個儲存庫。
    這裡的專案,不是Visuals Studio中的專案(Project),比較像Visual Studio中的解決方案(Solution)。
    以下以ERP專案為例。
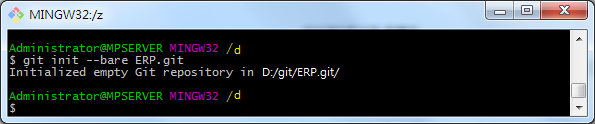
  4. 開啟「Git Bash」,依序執行以下指令為專案(如:ERP)建立Git儲存庫(ERP.git,凡透過bare初始化的儲存庫名稱慣例以.git結尾):
    cd /d/git
    git init --bare ERP.git

開發人員電腦

  1. 安裝Git for Windows。
  2. 開啟Visual Studio,「View」--「Team Explorer」視窗。
  3. 設定個人資訊,做為上傳Git儲存庫時的署名。

  4. 點選「Clone」,輸入Git伺服器分享出來的儲存庫位置,如下:
  5. 按下「Clone」後,即可自Git儲存庫複製檔案至指定的本機目錄(如:d:\playground\ERP)。
  6. 點選下方的EFP即可開啟此工作目錄。
  7. 再點選「New」,即可在此工作目錄下新增Visual Studio專案...
  8. 例如:ConsoleApp。
  9. 建置專案後,儲存此次異動:新增ConsoleApp專案。
  10. 同步至Git儲存庫。


其它開發人員,依相同方式存取。

參考:Bare Repositories

2015年3月18日 星期三