2022年4月21日 星期四

Python Modules

https://data-flair.training/blogs/python-modules/

什麼是 Python Modules?

內含 Python 程式/statements和定義/definitions 的檔案。

如 calc.py:

def add(a,b):
     return a+b
def sub(a,b): 
     return a-b
def mul(a,b):
     return a*b
def div(a,b):
     return a/b
def exp(a,b):
     return a**b
def floordiv(a,b):
     return a//b
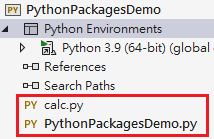
匯入模組

如此一來同目錄下的 PythonPackagesDemo.py 可以如下方式呼叫:

import calc #或是 from calc import *
sum=calc.add(1,2)
print(sum)

每個 module 會建立各自的 private symbol table,避免模組間的名稱衝突。

也可選擇性地匯入某些函式:

from calc import div as d, floordiv as fd

x= d(120,7)
print(x) #17.142857142857142

y=fd(120,7)
print(y) #17


Python Module Search Path

對於 import 的 module,Python interpreter 會依如下順序搜:

  1. 有沒有內建版本 ?
  2. 去 sys.path 目錄下找。 sys.path 是一個變數,初始值來自:
    1. 目前 Python 程式所在目錄
    2. PYTHONPATH 目錄清單,就像 shell 下的 PATH 變數。
    3. 預設安裝目錄 (installation-dependent default)
    4. 就算初始化,Python 程式也可修改 sys.path。

Compiled Python Files

若要加速,Python 可以把編譯過的 module快取在 __pycache__ 目錄,命名方式: module.version.pyc,區分不同 Python 版本。

如:在 CPython 3.3 版本,eggs.py 快取版的名字為 __pycache__/eggs.cpython-33.pyc.

編譯版會 platform-independent,若版本過期,Python 會自動重新編譯。

Python Standard Modules

Python 本身有 modules,有些內建在 interpreter 如 sys,有些只有在某些執行環境可用(如winreg 只在 Windows 上),我們也可以建立。如下可列出所有 sys 模組:

import sys

sys.version  
# '3.9.7 (tags/v3.9.7:1016ef3, Aug 30 2021, 20:19:38) [MSC v.1929 64 bit (AMD64)]'

for i in dir(sys): print(i)
'''
__breakpointhook__
__displayhook__
__doc__
略...
'''


Python 概覽

Python 執行

  1. Parser
    source code --> syntax tree
  2. Compiler
    syntax tree --> Python bytecode
  3. Interpreter
    以 REPL (Read-Evaluate-Print-Loop) 的方式逐行執行

程式組織結構

  • 函式/Functions
  • 類別/Classes (Python也是物件導向語)
  • 模組/Modules (相關 classes 與 functions 的集合)
  • 封包/Packages (modules 的集合)

2022年4月20日 星期三

Python 筆記

10 reasons why Python is better than C#

已經會C#,這篇是很好的起點,知道 Python 和C#有何不同,好在哪裡,要補K哪些文件。

The Python Standard Library

要補K那些?就看這簡潔又完整的官方文件。

Python 程式慣例與風格

每種程式都有它的風格和慣例,寫 Python 就用 Python 的慣例。透過好/壞寫法的比較,清楚該怎麼寫才是 Python style。

大多數情況下,我們是「讀」程式(code is read much more often than it is written),程式好讀對生產力大有幫助。

Switch to Python

已有程式經驗,切換至 Python 的步驟:

  1. The Basic Python Syntax
  2. Python args and kwargs: Demystified – Real Python
  3. Primer on Python Decorators – Real Python
  4. Python's Instance, Class, and Static Methods Demystified – Real Python
  5. Python Virtual Environments: A Primer – Real Python
  6. Python REST APIs With Flask, Connexion, and SQLAlchemy – Real Python
Real Python 網站很棒的地方是,Python 教學之後,還會提供「Real World Examples」,介紹實務上的用法及例子!

Python學習地圖

  • Python notes for beginners
    1. Python basic tutorial
    2. Syntax
    3. Statement, Indentation, and Comments
    4. Variables and Datatypes
    5. Operators
    6. Numbers
    7. Strings
    8. Data structure
    9. List
    10. Tuples
  • Python notes for intermediates
    1. Module
    2. Classes
    3. Methods
    4. Iterators
    5. Decorators
    6. Generators
  • Python notes for advanced learners
    1. Web framework
    2. Machine Learning
    3. Deep learning
    4. Artificial Intelligence
    5. Relational Database

避免錯誤

Why Python?

最後來點輕鬆的。

Guido van Rossum 命名靈感來自1970年代英國一個超現實/荒誕幽默喜劇團體 Monty Python。 Python 範例程式中的變數名稱叫 spam、eggs,也是在向他們的短劇 SPAM 致敬。

Monty Python 短劇: SPAM


2021年10月15日 星期五

C# 6 null ? 運算子

var readingCustomers = allCustomers

    .Where(c => c.Profile != null && 

c.Profile.DefaultShippingAddress != null && 

c.Profile.DefaultShippingAddress.Town == "Reading");

可以簡化成:

var readingCustomers = allCustomers

.Where(c => c.Profile?.DefaultShippingAddress?.Town == "Reading");

再來一個很適合用的例子:XML

string authorName = book.Element("author")?.Attribute("name")?.Value; 

如果有 author 元素,且它也有 name 屬性,就回傳,否則就是 null。


2021年9月25日 星期六

Speed Code 2: Effective C#

寫出有效率的C#程式,依主題條列化的筆記式寫法,光看目錄就馬上吸收到許多 tips,比如第一章〈C# Language idioms〉指出:

  • Item 1: Prefer Implicitly Typed Local Variables
  • Item 2: Prefer readonly to const 
  • Item 3: Prefer the is or as Operators to Casts
  • Item 4: Replace string.Format() with Interpolated Strings
  • Item 5: Prefer Formattable String for Culture-Specific Strings
  • Item 6: Avoid Stringly-Typed APIs
  • Item 7: Express Callbacks with Delegates
  • Item 8: Use the Null Conditional Operator for Event Invocations
  • Item 9: Minimize Boxing and Unboxing
  • Item 10: Use the new Modifier Only to React to Base Class Updates
  • .NET 臉笑維 已經讀了,而且寫下中文心得,請參考。

    「效率/Effective」是什麼?書裡提到 :

     a slower, correct program is better than a faster, broken program

    慢但正確比快但殘破的程式好。所以這本書的重點不在寫出跑得快的程式,而在寫出「正確」的程式,做對了,就做好了。

    作者深入 C# Compiler 行為,當我們知道程式怎麼被編譯,便自然能理解如何寫出正確、快速的程式。


    2021年9月22日 星期三

    Speed Code 1: 一定要會的 Visual Studio 快速鍵

    寫程式要快,熟悉開發工具是很基本的一件事,尤其是編寫程式時的鍵盤快捷鍵,不僅可以省下時間,還可以大大降低肌鍵炎的發生,這很重要!

    像是按著 Shift及Home/End 鍵可以選取至頭/至尾的文字,光是少掉一個抓滑鼠的動作,編寫程式的流程就順暢許多。

    看一下這十多分鐘的影片,可以幫你省下很多時間。

    Visual Studio Keyboard Shortcuts

    Visual Studio 的熱門鍵盤快速鍵

    剛開始不熟,多用幾次,把這張表印下來參考。相信我,只要一個上午你就都會了!

    https://visualstudio.microsoft.com/keyboard-shortcuts.pdf


    2020年10月19日 星期一

    Kendo UI Validator

    設定驗證規則

    HTML5 表單輸入欄位限制(Form input constraint attributes)

    透過 HTML 5 輸入欄位驗證屬性,瀏覽器會對這些條件進行驗證,基本上分為兩大類:
    • 資料型別(type)。如:url、email。
    • 驗證屬性(validation attribute),如:pattern、required、min、max、step、minlength、maxlength。
    但要考慮:使用者瀏覽器版本是否支援,即便支援也可能支援的不完全。還有一個問題:無法自訂驗證錯誤的訊息、位置及樣式。
    <form>
        姓名:<input type="text" name="name" required />
        網誌:<input type="url" name="blogUrl" required />
        <button>儲存</button>
    </form>
    https://dojo.telerik.com/@suefengcheng/OyiDiDaR/2

    Kendo UI Validator

    支援 HTML 5 表單輸入欄位限制外,還可自訂驗證條件。
      <form id="myform">
        姓名:<input type="text" name="name" required />
        網誌:<input type="url" name="blogUrl" required />
        <button id="save">儲存</button>
      </form>
      
      <script>
        $("#myform").kendoValidator({
             messages: {
                 onlyTomIsAllowed: "只接受Tom。",
                 url: "要是網址!",
                 required: "必要!",
             },
             rules: {
               onlyTomIsAllowed: function(input) {
                 if (input.is("[name=name]")) {
                     return input.val() === "Tom";
                 }
                 return true;
               }
             }
        });
        
        var validator = $("#myform").kendoValidator().data("kendoValidator");
        $("#save").on("click", function() {
          validator.validate();
        });
      </script>

    驗證對象

    Form 表單中所有輸入欄位。
    因此若要針對特定欄位驗證,請自行判斷input欄位。如下,針對名稱(name)為name的輸入欄位,驗證其值是否為 "Tom":
               onlyTomIsAllowed: function(input) {
                 if (input.is("[name=name]")) {
                     return input.val() === "Tom";
                 }
                 return true;
               }
    https://dojo.telerik.com/@suefengcheng/OyiDiDaR/3

    驗證順序

    Kendo UI Validator會先做HTML 5 輸入欄位驗證,通過後才跑自訂驗證。
    1. HTML 5 輸入欄位限制
    2. 自訂驗證條件

    顯示錯誤訊息

    Kendo UI Validator預設會將訊息放在輸入欄位旁,但這很可能被遮到。

    <span/>

    可自行加入一個<span/>,以data-for屬性指定對應的輸入欄位。如此,這輸入欄位的錯誤訊息便會顯示在這個<span/>裡。
      <form id="myform">
        <p>
          姓名:<input type="text" name="name" required /><br/>
          <span class="k-invalid-msg" data-for="name"></span>
        </p>
        <p>
          網誌:<input type="url" name="blogUrl" required /><br/>
          <span class="k-invalid-msg" data-for="blogUrl"></span>
        </p>
        <button id="save">儲存</button>
      </form>
    https://dojo.telerik.com/@suefengcheng/OyiDiDaR/3

    整筆/跨欄位驗證

    https://demos.telerik.com/kendo-ui/validator/custom-validation